


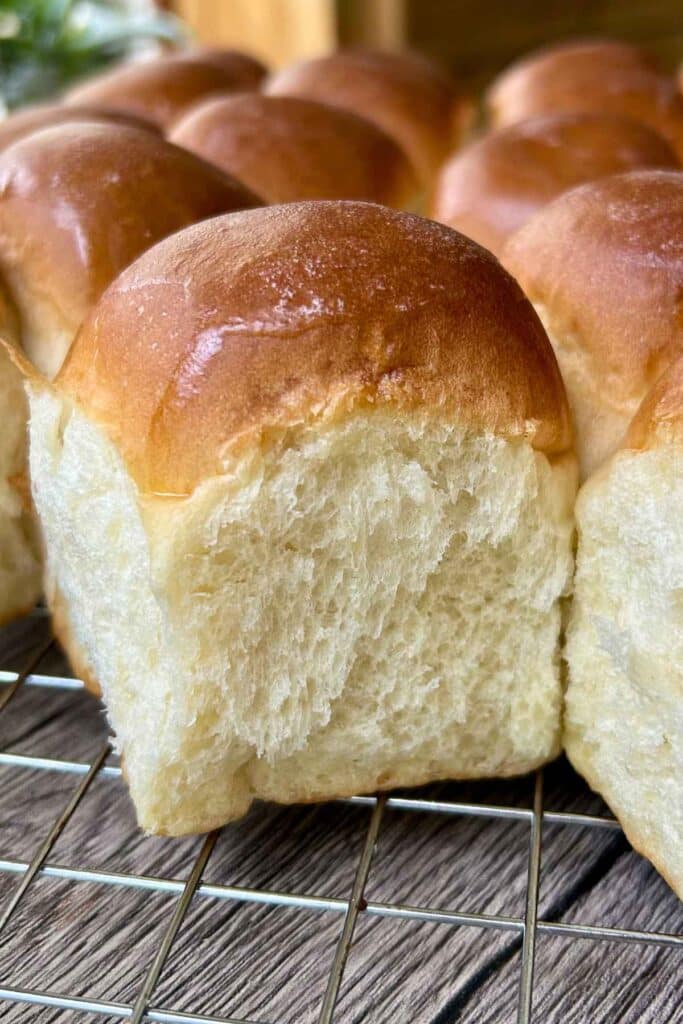
These Sweet Dinner Rolls are my mom's recipe - tall, fluffy, and the one bread that had to be on the table for every single holiday meal growing up. My Aunt Marlene made them too, and my youngest son makes them now.
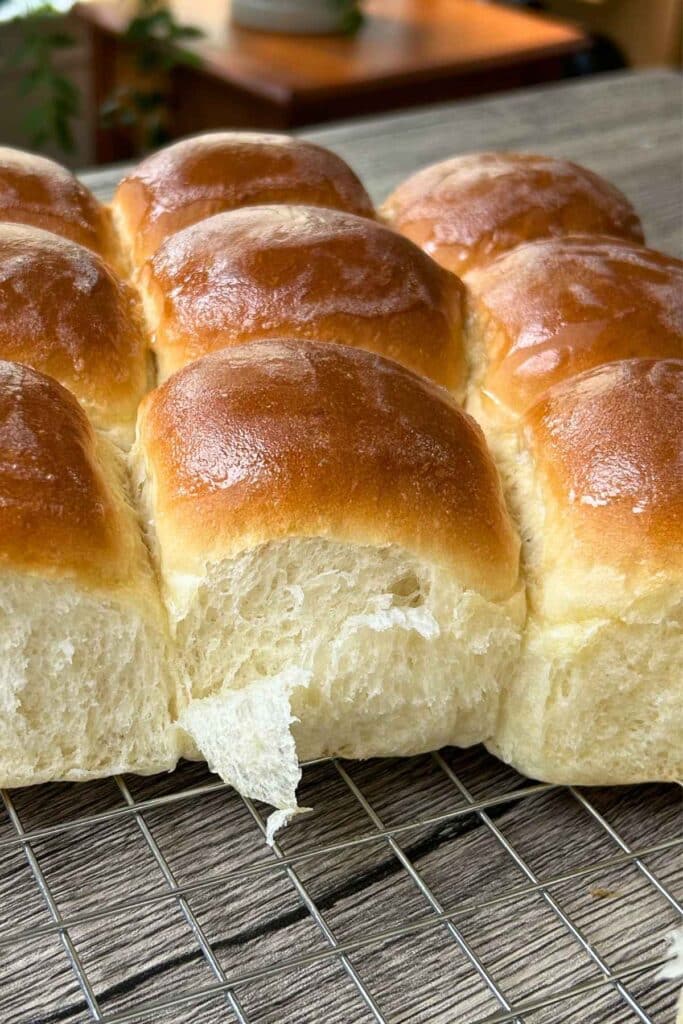
Made with bread flour, eggs, milk, and butter, these are soft homemade yeast rolls with a light, fluffy center and golden tops.
This recipe makes 24 rolls, which is just right for a holiday table with a few left for the next day. And honestly, the leftovers are half the reason I make them.
Jump to:
A Family Recipe, Three Generations Running
I didn't learn this recipe from a card or a cookbook. I learned it by watching. I'd stand in the kitchen and watch my mom work the dough, judge when it had risen enough, and pull the pans out golden brown. It looked complicated at the time. Years later when I finally made them myself, I realized it wasn't - I just needed to do it instead of only watching! Now my youngest son is the one making this dough, and he learned it the same way I did.
The real tradition happens after dinner. Once the turkey or ham has been carved and everyone's had their fill, these rolls become sandwich bread - split one open, pile in the leftovers, and that's the unofficial second meal of every holiday. If you only ever serve these alongside dinner, you're missing half the experience, so make extra.
Ingredients
Bread Flour: This gives the rolls their nice height and soft, chewy texture. All-purpose flour will work if that is what you have, but the rolls may not rise quite as tall.
Yeast: Active dry or instant both work here. If your active yeast has been sitting in the pantry for a while, stir it into the warm water first and let it sit about 5 minutes, until foamy.
Warm Water & Milk: The liquid should feel warm, not hot. If it is too hot, it can keep the dough from rising.
Eggs: Room temperature mix in better and help the dough rise the way it should.
Milk: Whole milk gives the best flavor and texture, but cashew milk works too.
Sugar: Don't skip this or cut it down - the sugar is crucial for giving these rolls their signature hint of sweetness and helping them get that tall, ultra-soft rise.

How to Make Homemade Sweet Dinner Rolls
I take a few shortcuts compared to how my mom did it, but the process is still the same. These rolls need two rises. The first rise happens after the dough is mixed and kneaded. The dough goes back in the bowl with a little oil, then gets covered until doubled in size.
The second rise happens after the rolls are shaped and placed in the pan. This is what gives them that soft, fluffy texture once they bake.
I use the proof setting on my oven because it keeps the dough nice and warm. If your oven does not have that setting, just place the covered dough in the warmest spot in your kitchen. That is what my mom always did.
I usually proof the yeast first out of habit. You can skip this step if you know your yeast is fresh, but it's a great insurance policy to make sure it's still active before you dive into the recipe.

How to slow down the proofing process
One of my favorite ways to make holiday baking easier is to make the dough the night before. Let it rise once, shape the rolls, place them in the pan, cover with plastic wrap, and refrigerate overnight.
The cold slows the dough down so it does not rise too fast. The next morning, take the pan out of the fridge, cover it with a clean towel, and let the rolls rise at room temperature before baking.
This is a great way to have fresh, hot rolls on the table without doing all the work that same day.
Bread Machine Method
If you do not have a stand mixer but do have a bread machine, you can use it to mix and proof the dough.
Add the wet ingredients, butter, and sugar first, then ad the flour. Make a small well in the flour and add the yeast. Use the dough cycle. Once the cycle is done, remove the dough, shape the rolls, and let them rise again before baking.
Use the bread machine for mixing and the first rise only. Do not bake the rolls in the machine.
Note: Cut the recipe in half if using a bread machine so the dough does not overflow.

Helpful Tips
- Give the dough time to rise. Bread making is not something to rush.
- Use room temperature ingredients. Cold ingredients can slow the dough down, and hot ingredients can hurt the yeast.
- Melt the butter just until melted. If it starts to bubble, let it cool before adding it to the dough.
- Brush the rolls with butter as soon as they come out of the oven. I usually unwrap one end of a stick of butter and rub it right over the warm tops.
Make Ahead & Freezer Instructions
To freeze before baking: Shape the rolls and place them in the pan, but do not let them rise a second time. Cover tightly and freeze. Once frozen, you can move them to a freezer bag if you need the pan back. When ready to bake, thaw them in the fridge overnight, then let them rise at room temperature before baking.
To freeze after baking: Let the rolls cool completely, then wrap well and freeze in an airtight bag or container for up to 2 to 3 months. Thaw at room temperature and warm in a 300°F oven for about 10 minutes.
To store leftovers: Keep baked rolls in an airtight bag at room temperature for up to 3 days.
FAQ
Not always. if your yeast is fresh, you can mix it right in, especially if you are using instant yeast. If your active dry yeast has been in the pantry for a while, bloom it first in the warm water until foamy, about 5 minutes.
Go by the dough, not the clock. A warm kitchen will make it rise faster, and a cool kitchen will slow it down. It is ready when it has doubled in size. This usually takes about 1 hour.
Yes. Shape the rolls, place them in the pan, cover, and refrigerate overnight before their second rise. The next day, let them rise at room temperature, then bake as directed.
Yes. Honey, maple syrup, or brown sugar can be used in place of granulated sugar.
Yes, this dough works well for hot cross buns, cinnamon rolls, monkey bread, and fried dough.

Other Dinner Roll Recipes You May Want to Try
Quick Dinner Rolls: Soft, buttery rolls when you need homemade bread fast.
Mom's Potato Rolls: Another family favorite with that soft, old-fashioned roll texture.
Sweet Potato Rolls: Lightly sweet rolls that fit right in on a holiday table.
Butternut Squash Rolls: Tender golden rolls with a mild, cozy flavor.
Maple Oat Bread: A soft loaf for toast, sandwiches, or warm slices with butter.
A Note About the Flour
I've had a few people tell me 8 cups of flour is too much - so I baked these again yesterday to show you what I mean. I used 7-½ cups of King Arthur Bread Flour, and it weight 901 grams. That's it. Not 8 cups, not 6 cups - just what the dough needed that day.
Here's the thing: 8 cups is a guide. How you scoop your flour matters. The measuring cup you use matters. If you're scooping straight from the bag, you're packing more flour in than if your spooning it. Over 8 cups, that really adds up.
My best advice? Weigh your flour. A kitchen scale will serve you better here than any measuring cup. I use King Arthur Bread Flour, which may also behave differently than what you have on hand. Add your flour a little at a time and trust the dough. You do not need to use all of the flour listed in the recipe, only use what you need for a soft, pliable dough.
📖 Recipe

Mom's Sweet Dinner Rolls
Equipment
As an Amazon Associate I earn from qualifying purchases.
Ingredients
- 1 cup warm water
- 1 cup warm milk
- 2 large eggs room temperature
- ⅔ cup unsalted butter melted and cooled
- ½ cup sugar
- 2 teaspoons salt
- 7½-8 cups King Arthur bread flour (about 901 grams) See Note about the flour above recipe card.
- 2 tablespoons active dry yeast
Instructions
Place ingredients in Kitchenaid attached with a dough hook as follows:
- Water, milk, eggs, sugar, butter, 3-½ cups flour, salt, yeast.
- Stir on low setting until the mixture starts to come together. This will be a wet, loose dough.
- Scrape down the sides of the Kitchenaid and stir with the dough hook another two minutes.
- Add remaining flour, ½ cup at a time, stirring with the dough hook on low until combined, stopping to scrape down the sides of the bowl occasionally.
- Knead the dough for another 3-4 minutes in the KitchenAid. The dough will pull away from the bowl.
- Remove the dough from the KitchenAid bowl and set the dough on a lightly floured surface.
- Clean the KitchenAid bowl, then lightly grease the bowl with oil. Place the dough back into the bowl, flip the dough over to coat with oil, and cover it with a towel or plastic wrap. Set in a warm spot and let rise until doubled in size.
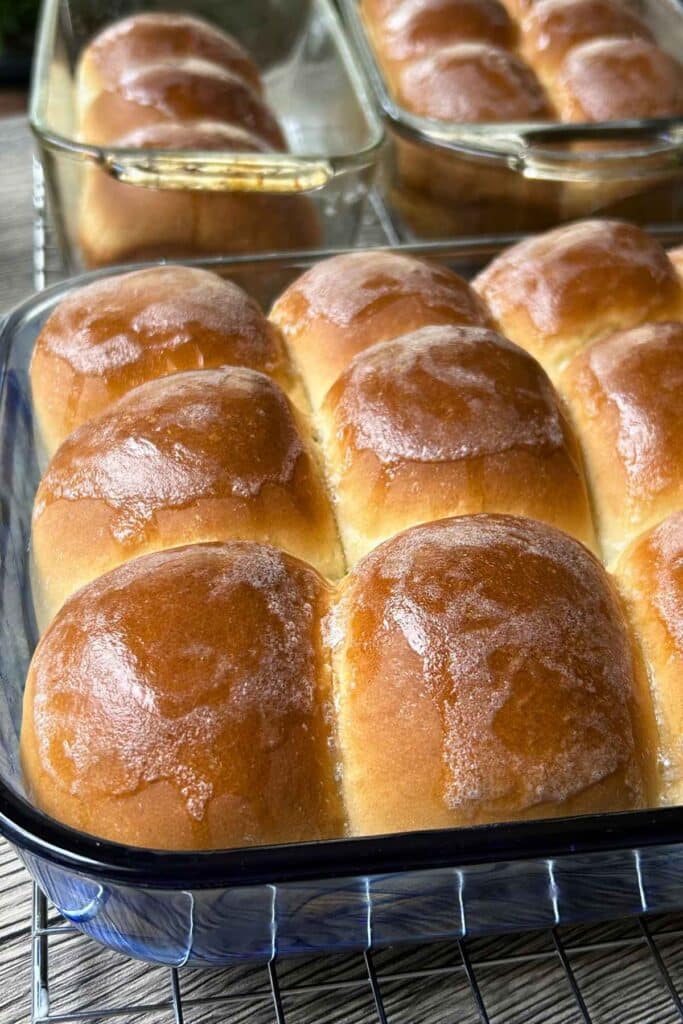
- Deflate the dough and turn it out onto a lightly floured surface. Cut the dough in half. Then cut each piece in half two more times (you will have 8 sections). Cut each of those sections into 3 equal pieces. You should have 24 rolls.
- Shape roll and place in 1-9x13 pan (18 rolls 3 across and 5 down) and in a 9x5 loaf pan (2 across and 3 down). Cover with a towel and let dough rise for 1 hour.
- Bake the rolls at 350 for 20-25 minutes or until rolls are golden brown. Remove from oven and immediately brush tops with butter.
- Serving Suggestion: Use a Bread Basket warmer and Stone to take from oven to table and keep your rolls warm!
- Store any leftover rolls in an airtight bag.
Jinx says
Great recipe, I think I put half a cup of flour (7 cups) too much so it was a little drier than I wanted. A couple issues that I wanted to know where I made a mistake. Taste and texture wise almost reminds me of a biscuit and tastes exactly like biscuits, is that because I put too much flour? I also noticed a very strong yeast smell after cooking. I let it double in size by waiting 1 hour in a towel covered bowl and then after cutting into rolls I let it rest in the open for 1 more hour. I used 3 7g packets of active dry yeast. Did I over proof or some other obvious mistake?
Shelby Law Ruttan says
Hi Jinx, First off, thank you for trying the recipe and giving it 5 stars! I'm happy to help you troubleshoot so your next batch turns out soft and tender! For the yeasty smell, it could be because you didn't cover the rolls with a towel during the second rise. That time spent uncovered could cause the rolls to form a tight skin (the roll would dry out left in the open air) restricting the rolls from expanding to get that pillow-like texture. Because the rolls baked up dense and compact, the gases likely couldn't escape and became heavily concentrated inside the roll. One question for you, did you make sure to add oil the bowl for the first rise? The oil adds moisture as well and I never need flour when shaping the rolls for the second rise).
As for the flour, I recently added to my post (just above the recipe card) how the measurement of flour is vital for this recipe and I myself have moved to weighing my flour (in grams) over cups as it is more accurate. There can be a huge difference in how much flour you actually use depending on how you fill the measuring cup, or even with the type of measuring cup you use. When adding flour during the final kneading of the dough before the first rise, you don't want the dough to be too sticky, but you also don't want it to be too dry. The dough should still be slightly tacky, meaning it can stick to your fingers, or the countertop, but easily pull away without dough being stuck all over your hands or counter. I hope this helps and feel free to reach out by email if you have any other questions!
Jinx says
Thank you for the reply, I did coat the bowl with some olive oil during the first rise, Ill try the recipe again today and have the second rise covered, less flour, and see how it goes!
Sherrilee says
I found that 8 cups was too much flour. I used 6 cups
Shelby Law Ruttan says
Hi Sherrilee, thank you for stopping by. Often, the amount of flour, when measured in cups, can vary depend on how it is taken out of the flour container. If it's packed tight, rather than loosely, it could be too much. This is why recipes will read so many cups, or as needed. Hope they turned out well for you and that you will come back and give the recipe a rating. Thanks!
Bethany Draper says
How long should you let it rest well you are waiting for it to double in size before you divide the dough out?
Shelby Law Ruttan says
Hi Bethany, Rise time is going to depend on room temperature, the cooler the room, the slower the rise and if the air is warmer, it will take less time. This is why I say until it is double in size, however, generally 1 hour is a good estimate.
Cheryl says
You don’t need to activate the yeast?
Shelby Law Ruttan says
Hi Cheryl, you don't always have to bloom active yeast. If your yeast is older though, I do recommend blooming it first. I hope this answers your question. You can also use instant yeast instead (which you do not have to bloom).
Christine Murphy says
Could you make hot cross buns with this recipe?
Shelby Law Ruttan says
Yes, you could use the dough for the bun part yes. Hot Cross Buns usually include spices, fruit (such as raisins), and citrus which you would want to add to the flour mixture. To finish you would want to make a paste of flour and water to make the cross on the bun and a light confectioner sugar glaze to top.
Shelby Law Ruttan says
By far, the best dinner roll I've made and I've been making this one for over 20 years now. They are super soft and fluffy and they are always a request for any holiday meal.
Tania R says
I love making these rolls my daughter love them more than my milk Tangzhong recipe. Could I substitute the sugar for honey in this recipe?
Shelby Law Ruttan says
Hi Tania, yes you could use any sweetener you prefer (honey, maple syrup, brown sugar).
Emily says
What if I want to make them the day before and then bake them. Do I make the rolls then put them in the fridge until the next day and then let them rise and bake?
Shelby Law Ruttan says
Hi Emily, yes, you can refrigerate the shaped rolls overnight. You could also refrigerate the dough, then bring to room temperature the next day, shape and bake. I hope this helps!
antony guzman says
absolutely amazing. I cut the recipe in half n ohhhhh my god. even that was perfect. very soft. buttery n Sweet. definitely a must try recipe
Ler says
Everyone loves these and I have been asked several times to make them for pot luck get-togethers. Simple recipe that always comes out great. I proof them in my husband's truck since the black interiors makes it perfectly warm in the sun. The neighbors get excited when they see the bowl go into the truck.
Arthur in the Garden! says
Yummy!
Wanda says
This makes the lightest rolls or cinnamon rolls
Sheila B says
First time making rolls (that don't come from a box). They are incredible! Thank you so much for this wonderful recipe. It is now my go to.
Rhonda says
Loved this recipe!! They were easy to make to make and they taste wonderful! I made them for Thanksgiving and they were a big hit.
Debbie says
Can you make the rolls ahead of time
Shelby Law Ruttan says
Sure can! If you do, just warm them in the oven before serving.
Zz says
So glad i finally found a great roll recipe. These were just delicious I made 2 batches in the bread machine turned out better than my mixer.
Sue says
Did you divide the recipe into 2 or did you make 2 complete batches.
Just not sure as to why we would have to divide it.
Thank You
Shelby Law Ruttan says
Hi Sue, when I made this recipe I made one full batch, I had to use two different pans to bake because I did not have a pan large enough. This recipe will make 2 dozen rolls. I fit 18 rolls in a 9x13 and 6 rolls in a bread loaf pan. If you have a pan large enough to fit all 24 rolls in, then you can cook them all in one pan.
Lisa J says
Shelby,
Can I use good old regular Fleishman's yeast? And I only need 2Tbls?
Shelby Law Ruttan says
Fleishman's is a brand of yeast. As long as you are using active dry or instant yeast you will be fine. 2 tablespoons is what the recipe calls for so yes, you need 2 tbsps.
Sheila says
Please put a link in the recipe that says "jump to the recipe" I've made several batches of this recipe. (Love it! It's the best ever!) But each time I have to scroll past the blog, all the way down to the recipe.
It would be so helpful to just get to the recipe. Thank you so much.
I'm about to try this recipe for cinnamon rolls. 😁
Shelby Law Ruttan says
Hi Shelia, there is a jump to recipe link at the very top of the post (just under the description) and it is underlined. Maybe you scrolled past it. So happy you enjoyed the dinner rolls, these are a family favorite we all make and have been making for years now 🙂 Thank you!
T says
Can I use fresh yeast?
Shelby Law Ruttan says
Yes, just read your packaging and follow directions for using that type of yeast.
Lesa says
Do you have the recipe in grams? Mainly the flour or how do you measure your flour? I’m fairly new to bread making and I want them to turn out right.
Thanks
Lesa
Shelby Law Ruttan says
Lesa, I do not have them in grams as in the post, however there are 120 grams of flour in each cup so for 8 cups it would be 960 grams. If staying with a measuring cup, be sure to stir the flour in the canister, then lightly spoon it into the measuring cup. Do not tap the cup to pack it. I always fill to the top of the cup,then scrape excess off with a knife. Please do check it out the other tips I provide in the post and good luck!
Kim says
Can I use it to make a loaf of bread instead of rolls
Shelby Law Ruttan says
I don't see why not however it will be a heavier loaf due to the fact it has the eggs in it. I do have a recipe for homemade white bread here on the site if you are looking for a soft loaf of bread.
Jenna says
Can I use rapid yeast in this recipe?
Shelby Law Ruttan says
Yes you may do so, if doing so, it probably will rise quicker than if you used active dry so you will need less rise time.
Liz says
We love these rolls! I'll make them again for Easter!!!
Jennifer says
I love homemade rolls, and these seem so easy to make! I can’t wait to try them!
Cheryl says
If you have 8 then cut those into 4 piecs each that is 32 rolls not 24. Did you only divide into 3 to get 24 rolls?
Shelby Law Ruttan says
You are correct. Thank you for bringing this error to my attention.
Debbie says
I don't have a dough mixer can I do by hand
Shelby Law Ruttan says
Yes, you can do by hand, just be sure to knead it good. Enjoy!
Sewingmom1 says
I made this recipe this past weekend. They were so fluffy. I make 15 rolls and then made cinnamon rolls qith the left over.
Kelley says
You said store leftovers in a bag…..I can’t imagine having any left over lol. Thanks for the recipe!!
Jen says
These are delicious. It took me a few tries to get the hang of working with dough but I followed it exactly and they are so good!
Nancy says
Wonderful recipe! Turns out perfectly every time and tastes very much like my grandmother’s roles😊
Liz T says
They came out great! Love this recipe & it’s a keeper! It was so delicious and an easy recipe to follow. Thank you!
Sam says
I made the rolls by the recipe but my flour was dry.
I put it to rise and it did rise like it was suppose to
I’m just awaiting the second rise and baking them
I hope they’re light and fluffy, not heavy
Shelby Law Ruttan says
Hi Sam, I wouldn't overwork the dough any more than I had to at this point. Also, if the dough is dry, you can always add more liquid to help. Let me know how they turned out for you. THanks! Shelby
Janet says
Loved this recipe! This my new go to roll! Just wanted to say that I was quite confused when I was making the rolls as math is not my strong point; 5 rows 3 across is 15 rolls. I had to stop & do a word problem lol! Seriously this is a great recipe as is. No changes. I love in south Louisiana so usually need to use more flour due to the humidity. Whisk your flour, scoop & level. Thanks
Heather Brumley says
We just had a baking day for yeast rolls and made 3 recipes we found on Pinterest. This was THE BEST recipe I have ever tried. From the minute I turned the dough out to roll, I knew they were going to be good just by the way it handled. I highly recommend this recipe. We ended up just making balls and baking them that way and they turned out perfect!
Shelby Law Ruttan says
Hi Heather! Thank you so much for coming back to review the recipe. I am so happy they turned out perfect for you too! Shelby
Ljiljana says
Excellent.I used a bred machine and froze both baked and dough.
Greg says
Can I cut the salt in half....low sodium diet here
Shelby Law Ruttan says
Hi Greg, yes, you can reduce the salt. Enjoy! Shelby
connie j swaim says
I put the full recipe in my breadmaker. It lifted the lid to my breadmaker as it was rising but worked out perfectly and smelled so good!
Shelby Law Ruttan says
That's great to hear! So happy it worked out for you. Shelby
Shelly J Bentley says
I don't know what happened to mine but the dough did not rise correctly (yeast was not outdated) and I could not put the amount of flour this recipe called for because the dough was so dry it couldn't mix so I added a little less and had to add more liquid. Any suggestions?
Shelby Law Ruttan says
Hi Shelly, There are a couple of things that could have affected this. If the flour is packed into the measuring cup, instead of spooning and leveling off, it could have too much flour. Or, it could have been the temperature of the water. My guess, from what you say here, is it was probably a flour issues.
luda says
you put 8 cups in the recipe. but the directions only call for FOUR. total. so you might want to fix that. no wonder her dough was as dry as the desert.
Shelby Law Ruttan says
I believe you did not read the recipe correctly. You start with 3-1/2 cups of flour, then you add the remaining flour (meaning what is left of the flour) 1/2 cup at a time as instructed in step 4. The amount of flour is correct. I am going to assume that the instructions were not followed carefully as it was instructed to do so in my post.
Tami Hansen says
Most bread machine recipes call for 4 cups of flour at the most. Will this work with this much ingredients in a 2 lb bread machine?
Shelby Law Ruttan says
Hi Tami, I don't use a bread machine so I can't say, however, from what you have told me I would say just cut the ingredients to this recipe in half and try it in the bread machine. I think the amount of dough this recipe makes as a full recipe would be too much for your bread machine.
Katrina says
Just made these for dinner tonight! They look great and everyone said they taste great (course, I didn't get to partake of the gluten). <3
Shelby Law Ruttan says
Hi Katrina~Yay! So glad your family enjoyed them (even if you couldn't!) Thank you for rating the recipe! Shel y
Pattie Clemons says
Do you think you could make these rolls and before the 2nd rise that you could freeze them. I would like to make a week ahead of time. I would then thaw and let rise and bake. I guess like the loaves of frozen bread dough you buy. Thank you!
Shelby Law Ruttan says
Hi Pattie, I think that would work! I would pull them out the night before and put in the refrigerator, then take out to finish rising in a warm spot before baking. Enjoy! Shelby
Cathy Ratliffe says
Thank you so much many recipes don’t call for sugar in rolls but that’s the only way my gr8aunt would make . I love them this way thanks again
Shelby Law Ruttan says
Hi Cathy, your welcome and thanks for stopping by! Shelby
Lynne says
Can this recipe be frozen?if so Blackwood you do iy?
Shelby Law Ruttan says
Hi Doris, yes, this recipe can be frozen up to 3 months, just be sure it is completely cooled and in an airtight packaging. I'm not sure what the rest of your question is. ˜Shelby
Lynne says
How well does this recipe do when cut in half?
Shelby Law Ruttan says
Hi Lynne, it should work for you to cut it in half. Thanks for stopping by!
Jennifer W says
Can I substitute regular milk for the almond milk?
Shelby says
Absolutely!
Peggy Clyde says
Your rolls look beautiful and I'm sure they tasted wonderful.